As we make our way into our late 20s, there are certain proclivities we’ve become more inclined to. Take for example the need to get up before noon on a weekend (okay, we’re still working on that one), or washing off our makeup before bed, or packing more than PBRs and limp sliced bread slathered with mustard and cold cuts for full day at the park or beach. It’s all a work in progress, friends. But it’s thanks to saving graces like Sarah Britton, the holistic nutritionist behind our favorite foodie blog (and now book) My New Roots, who’s taught us that making nutrient-packed, whole foods is just as easy and satisfying as 7/11 grub (but, like, way better for us)—as evidenced by this wickedly delicious holistic breakfast she whipped up for us just a short time ago. But thus, some recipes are relegated for other occasions (uh, as in they aren’t as mobile), so we asked Britton to share her favorite summery make-ahead recipes for easy transport from kitchen to basket to picnic blanket.


HEIRLOOM TOMATOES
With Oil-Cured Olives and Crusty Bread
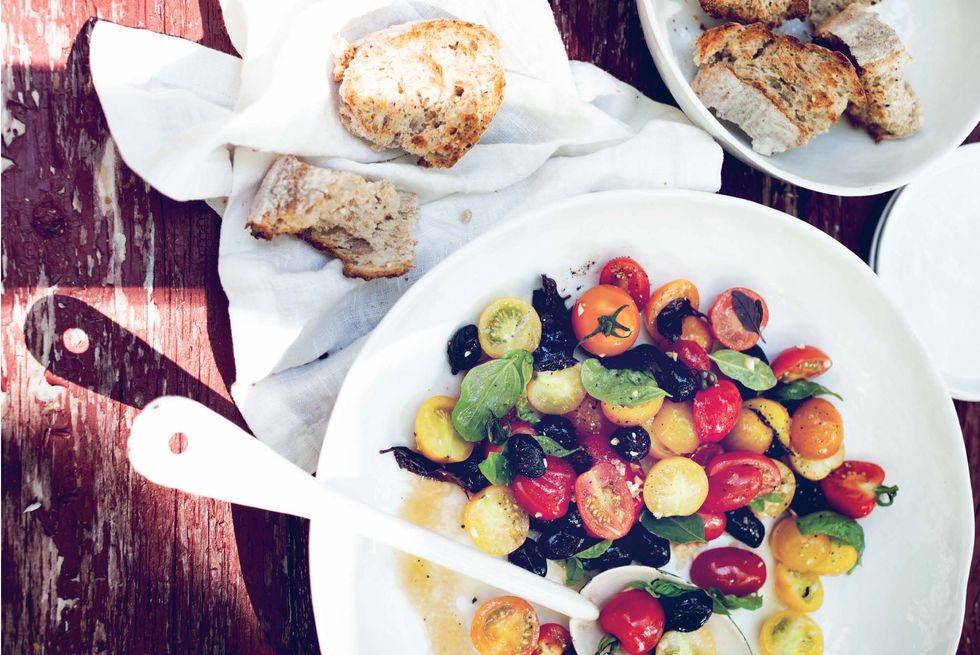
INGREDIENTS:
2 tbsp. cold-pressed olive oil
2 tsp. apple cider vinegar
1 ½ tsp. pure maple syrup
2 garlic cloves, minced
Flaky sea salt and freshly cracked black pepper, plus more as desired
1 ½ pounds heirloom tomatoes
1 cup sun-dried oil-cured olives
Small handful fresh green basil leaves
Small handful fresh purple basil leaves
1 loaf crusty gluten-free whole-grain sourdough bread
DIRECTIONS:
1. Whisk the olive oil, vinegar, maple syrup, and garlic together in a small bowl, and season with flaky salt and cracked pepper. Let sit for 5 minutes for the flavors to meld.
2. Slice the tomatoes in halves or quarters, depending on their size. Combine with the olives and both types of basil in a large bowl. Pour the dressing over, and toss to combine. Season with flaky salt and pepper, and serve with slices of the crusty bread.
BONUS:
OLIVES: Aside from being totally delicious, olives boast an astounding number of phytonutrients. Few high-fat foods offer such a diverse range of antioxidant and anti- inflammatory benefits, some of which are unique to olives themselves. And although they are a high-fat food, keep in mind that almost 75% of their fat comes from oleic acid, a monounsaturated, heart-healthy lipid. Key nutrients in olives include vitamin E, vitamin A, and many of the B vitamins.
SORREL
Hummus
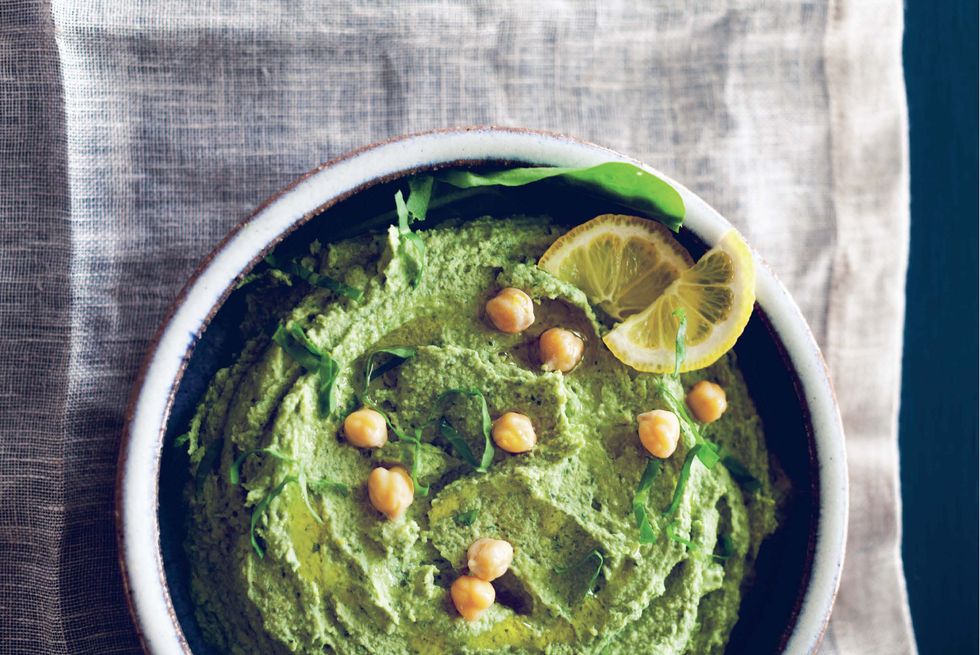
INGREDIENTS:
2 garlic cloves
1 ½ ounces sorrel leaves, roughly chopped
1 ½ cups cooked chickpeas (about one 250g can)
¼ cup tahini
Grated zest of 1 organic lemon
1 ½ tbsp. freshly squeezed lemon juice
½ teaspoon fine sea salt, plus more if desired
1 1⁄2 tsp. pure maple syrup or raw honey
Cold-pressed olive oil, for serving
DIRECTIONS:
1. Put the garlic in a food processor and pulse to mince. Add the sorrel, chickpeas, tahini, lemon zest and juice, salt, maple syrup, and ¼ cup water, and blend on the highest setting until smooth. Season with more salt
if needed.
2. Transfer the hummus to a serving bowl, drizzle olive oil over the top, and serve. Store any leftovers in an airtight container in the fridge for 3 to 4 days.
BONUS:
SORREL: "Did you know that sorrel has the same powerful antioxidants and healing properties as kale? It also contains good amounts of vitamin C, fiber, iron, magnesium, and zinc. Sorrel is wonderful mixed with other salad greens and used as a seasoning in soups, casseroles, and omelets. Growing sorrel is very easy at home, even in containers. If you don’t have any outdoor space for it, look for sorrel at farmers’ markets and gourmet grocery stores from early spring through early summer. It resembles spinach, but one taste and you will know it’s something entirely different! Choose sorrel with small leaves, as the young ones are tender and have the best flavor."
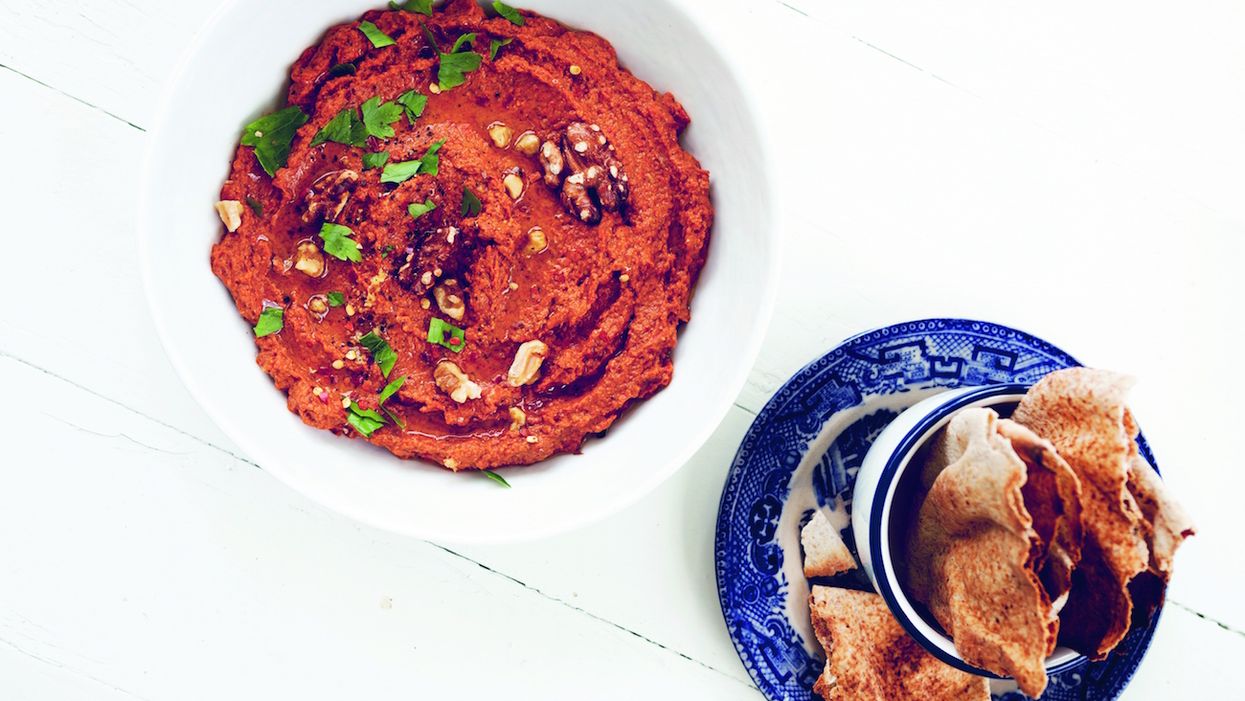
ROASTED RED PEPPER
Walnut Dip
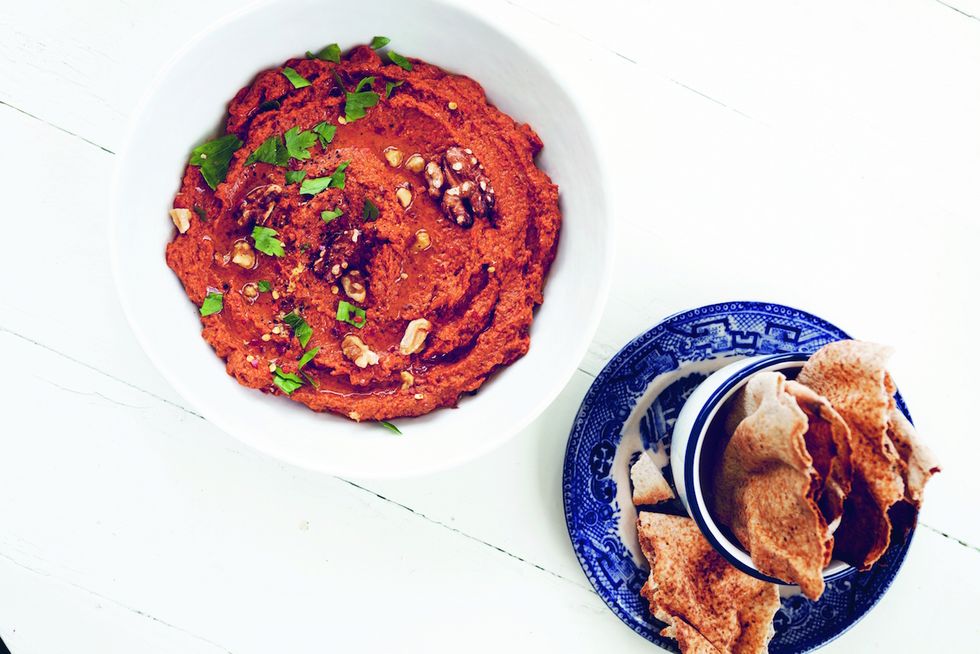
“Dips are an entire food group to me. I always have at least one on hand to spread on toast for a quick meal, to snack on with carrot sticks, or to use as a dressing in a grain salad. As much as I love hummus, I enjoy exploring the world of dips that use vegetables, nuts, and seeds as a base. This dip is particularly delicious in late summer, when the peppers are at their peak, but you can also make a decent version in the cooler months, as roasted bell peppers take on an incredible sweetness and depth of flavor. Complex and full of spices and tangy notes, the dip is delicious on everything . . .including a spoon if you can’t find anything else! (If you want to increase the protein in this dip, add a handful of chickpeas, kidney beans, or lentils.)”
INGREDIENTS:
3 large red bell peppers (about 1 ½ pounds)
1 tsp. coconut oil 1 cup raw walnuts 1 large garlic clove
3 tbsp. cold-pressed olive oil
Grated zest of 1 organic lemon
Freshly squeezed juice of 1⁄2 lemon
1 tsp. ground cumin
1⁄2 tsp. smoked paprika
Pinch of cayenne pepper
1⁄2 tsp. fine sea salt
Fresh parsley (optional)
DIRECTIONS:
1. Preheat the oven to 400°F / 200°C. Line a baking sheet with parchment paper.
2. Rub the peppers with the coconut oil and put them on the prepared baking sheet. Roast for 35 to 40 minutes, until blistered and blackened in a few places. Transfer the peppers to a bowl, quickly cover it with plastic wrap, and set the bowl aside for 10 minutes (this will steam the peppers, making the skin very easy to remove).
3. Reduce the oven temperature to 325°F / 170°C.
4. Spread the walnuts on a separate baking sheet and toast for 7 to 10 minutes, watching carefully so that they do not burn. Remove from the oven and set aside to cool.
5. When they have cooled, slip the skins off the peppers
and discard them.
6. In a food processor, pulse the garlic until minced. Add the walnuts, peppers, olive oil, lemon zest and juice, cumin, paprika, cayenne, and sea salt and blend on high until the desired consistency is reached—smooth or slightly chunky, whatever you prefer. Season to taste and garnish with the parsley before enjoying in your favorite manner.
BONUS:
BELL PEPPERS: "Did you know that green peppers are just immature red peppers? It’s true! The first time I realized this was when I was working on an organic farm in Arizona. I picked a bunch of green peppers, thinking they were ripe, and the farm manager had a total bird. “Those needed another few weeks to ripen!” he said. And then he explained that the green ones were just immature red ones. I felt terrible, but I learned an important lesson, and why you shouldn’t eat green peppers at all. It’s difficult for your body to digest them because they aren’t ripe yet. (This also explains why they are so much less expensive than their red older brothers.) Pass on green peppers from now on, in favor of red, yellow, and orange ones."
MINTY
Black Bean Salad
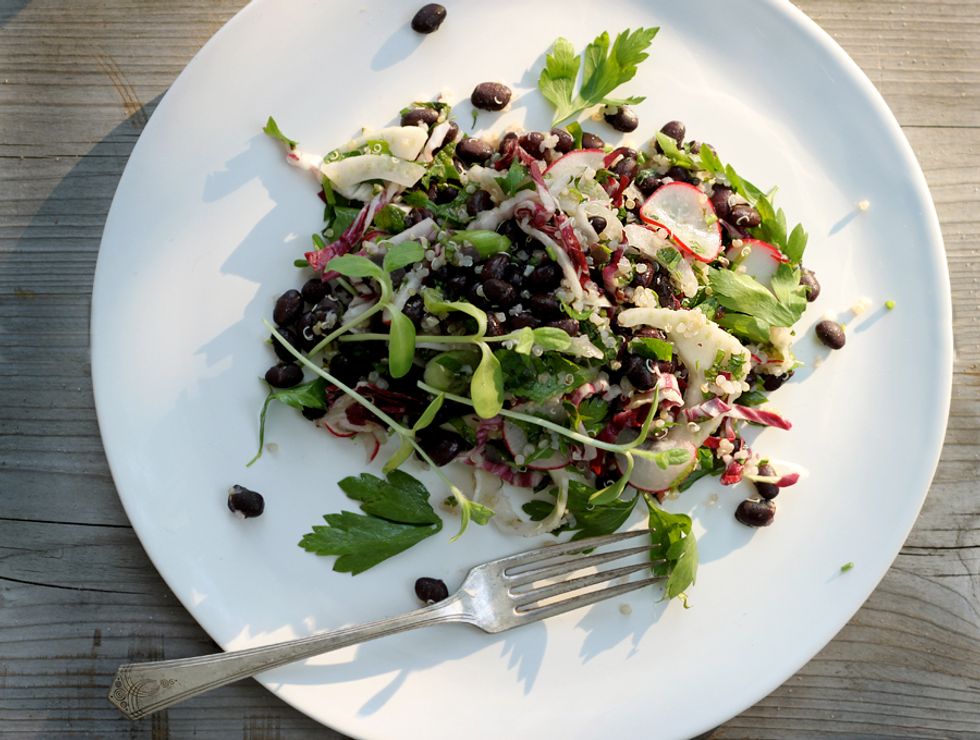
“I created a Minty Black Bean Salad full of fresh herbs and crispy veggies to energize and revitalize. The herbs in this salad are not garnish, but a major ingredient in the dish and should be added with abandon. If you don’t have enough black beans, combine them with another legume, like navy or lima beans. The quinoa can be substituted for brown rice, millet, or even spelt or wheat berries. Pick any summer veg you’ve got hanging around too – green peas would be amazing and so would summer squash. The point here is to be flexible and plentiful! Feeding a crowd can be easy and tons of fun if you can harness the bold, flavor seeker inside yourself, and have the confidence to toss a salad in a mammoth roasting pan with your bare hands, ‘cause that’s how it’s done.”
INGREDIENTS:
9 cups dried black beans, soaked overnight (or 8 hours)
1 ½ cups quinoa, soaked overnight (or 8 hours)
2 large fennel bulbs
1 head radicchio
1 bunch radishes
2 bunches green onions
3 bunches mint
1 bunch flat-leaf parsley
A few handfuls sprouts (I used sunflower)
DRESSING:
Juice of 2 lemons
Juice of 3 limes
1 clove garlic, minced
½ tsp. fine grain sea salt>/big>
½ cup cold-pressed olive oil
2 tbsp. maple syrup (or liquid honey)
A couple pinches cayenne pepper
DIRECTIONS:
1. Place the black beans and quinoa is separate bowls and cover with plenty of water. Let soak for at least 8 hours, or overnight.
2. Drain and rinse both beans and quinoa well. Place beans in a large pot, cover with water, bring to a boil and reduce to simmer with the lid on for about 40 minutes. Add three tablespoons of salt and continue to cook until soft (but not mushy!) – another 10 minutes or so. Drain and rinse well. Let cool.
3. Place quinoa in a pot, add 2 ½ cups water and a teaspoons of salt. With the lid on, bring to the boil and reduce to simmer. Cook until tender, 15 minutes or so. Set aside with the lid off to let cool.
4. Make the dressing by placing all ingredients in a jar with a tight fitting lid. Shake to combine.
5. Prepare the vegetables. Begin by slicing the fennel bulb into very thin strips (a mandolin may help). Place fennel in a large serving vessel, pour a little of the dressing over, and toss to marinate (this also prevents browning). Add thinly sliced radish and green onions, toss to coat. Next add the cooled black beans and quinoa and pour the remaining dressing on top. Fold to combine. Let sit for 20-30 minutes to marinate.
6. Chop the herbs and radicchio, and add to the salad. Fold to incorporate. Season to taste. Sprinkle sprouts on top if desired, and serve to a hungry crowd.
TROPICAL CHEWY
Granola Bars
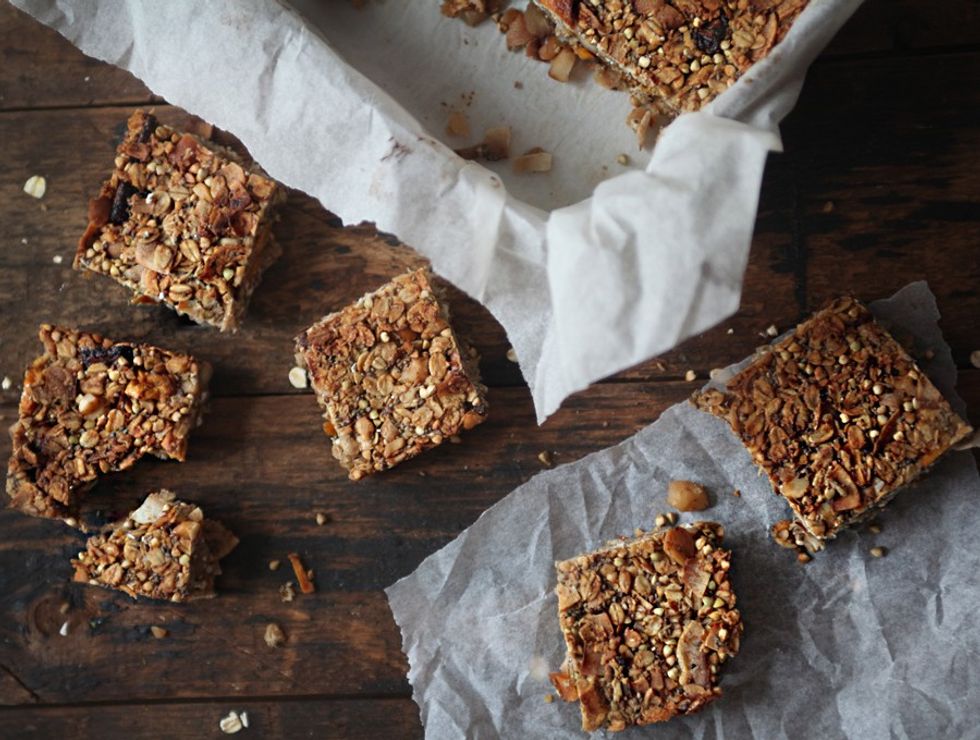
“These Tropical Chewy Granola Bars are a very versatile recipe and you can make several substitutions if you are missing some ingredients or aren’t into them. I used ripe bananas as the liquid binding agent, but if you don’t like bananas, replace them with ½ cup of applesauce. You could also use 2 eggs. Instead of the dried fruit I used, feel free to change it up: dried pineapple would be great, as would dates, cranberries, cherries, or raisins. Of course this will change the flavor a great deal, but if you want to adapt the recipe to the seasons and what is available, you most certainly can do that. Replace the buckwheat with oats if desired, the honey with maple syrup, the coconut oil with butter or ghee. And if macadamia nuts are unavailable, any nut will do – almonds, pecans, or cashews would be really good in these.”
INGREDIENTS:
(Makes 12-16 bars)
2 Tbsp. chia seeds + 6 Tbsp. water
2 cups rolled oats (certified gluten-free if possible)
½ cup raw buckwheat groats 1 cup coconut flakes
¾ cup macadamia nuts, chopped
60g dried banana, chopped (or Medjool dates)
60g dried mango, chopped
¼ cup coconut oil
1/3 cup honey (or maple syrup)
1 vanilla bean, seeds scraped (or 1 tsp. extract)
2 very ripe bananas
½ tsp. coarse sea salt
DIRECTIONS:
1. In a small bowl, combine chia seeds and water to make a gel. Set aside.
2. Spread the oats, buckwheat, coconut and macadamia nuts out on a baking sheet and place in a 300°F / 150°C oven. Stir every 5 minutes or so, until lightly toasted, about 15 minutes. Remove from oven and let cool.
3. While the oat mixture is toasting, make the liquid. In a small saucepan combine coconut oil, honey, and vanilla. Whisk over low-medium heat until melted and thoroughly combined.
4. In a food processor or blender, blend peeled bananas with the honey and oil mixture. Blend until smooth. Pulse in chia gel gently, just to combine.
5. In a large mixing bowl combine toasted oat mixture, sea salt, and chopped dried fruit. Pour in the liquid and stir well to combine.
6. Turn the oven up to 350°F / 175°C. Spread a large piece of parchment paper in an 8” x 8” (20 x 20 cm) baking pan, overlapping the sides. Pour the granola bar mixture into the pan and press down firmly with a spatula, especially in the corners. Bake for 25-30 minutes until golden on top and around the edges.
7. Remove from oven and let cool for at least 30 minutes. To take the granola slab out of the pan, simply lift up the sides of the parchment. Place on a flat surface and cut into rectangles or squares (12-16, depending on the size). Store in an airtight container in the fridge for up to two weeks. Best if kept cold, as this prevents the bars from crumbling.
Read more about these recipes on My New Roots. Heirloom Tomatoes, Sorrel Hummus, and Roasted Red Pepper recipes are from Britton's new cookbook, My New Roots—and there's plenty more where they came from. Photography courtesy Sarah Britton.